Build Your Own SMTP Mail Server on AWS EC2 Using Node.js — A Complete Hands-On Guide
Introduction
Ever wondered what really happens when you click "Send" on an email? Behind the scenes, a chain of DNS lookups, protocol handshakes, and server communications takes place — all orchestrated by SMTP (Simple Mail Transfer Protocol).
In this tutorial, we'll demystify email delivery by building a custom SMTP server from scratch — hosted on Amazon EC2. By the end, you'll have a working mail server that can receive emails on your own domain, and a deep understanding of how email infrastructure works under the hood.
🔗 This post is based on my video walkthrough: Build Your Own Mail Server | SMTP Server
Prerequisites
Before you begin, make sure you have:
An AWS account with access to the EC2 console
A registered domain name (with access to DNS management)
Basic familiarity with Linux terminal commands
Basic understanding of Node.js
How Email Delivery Actually Works
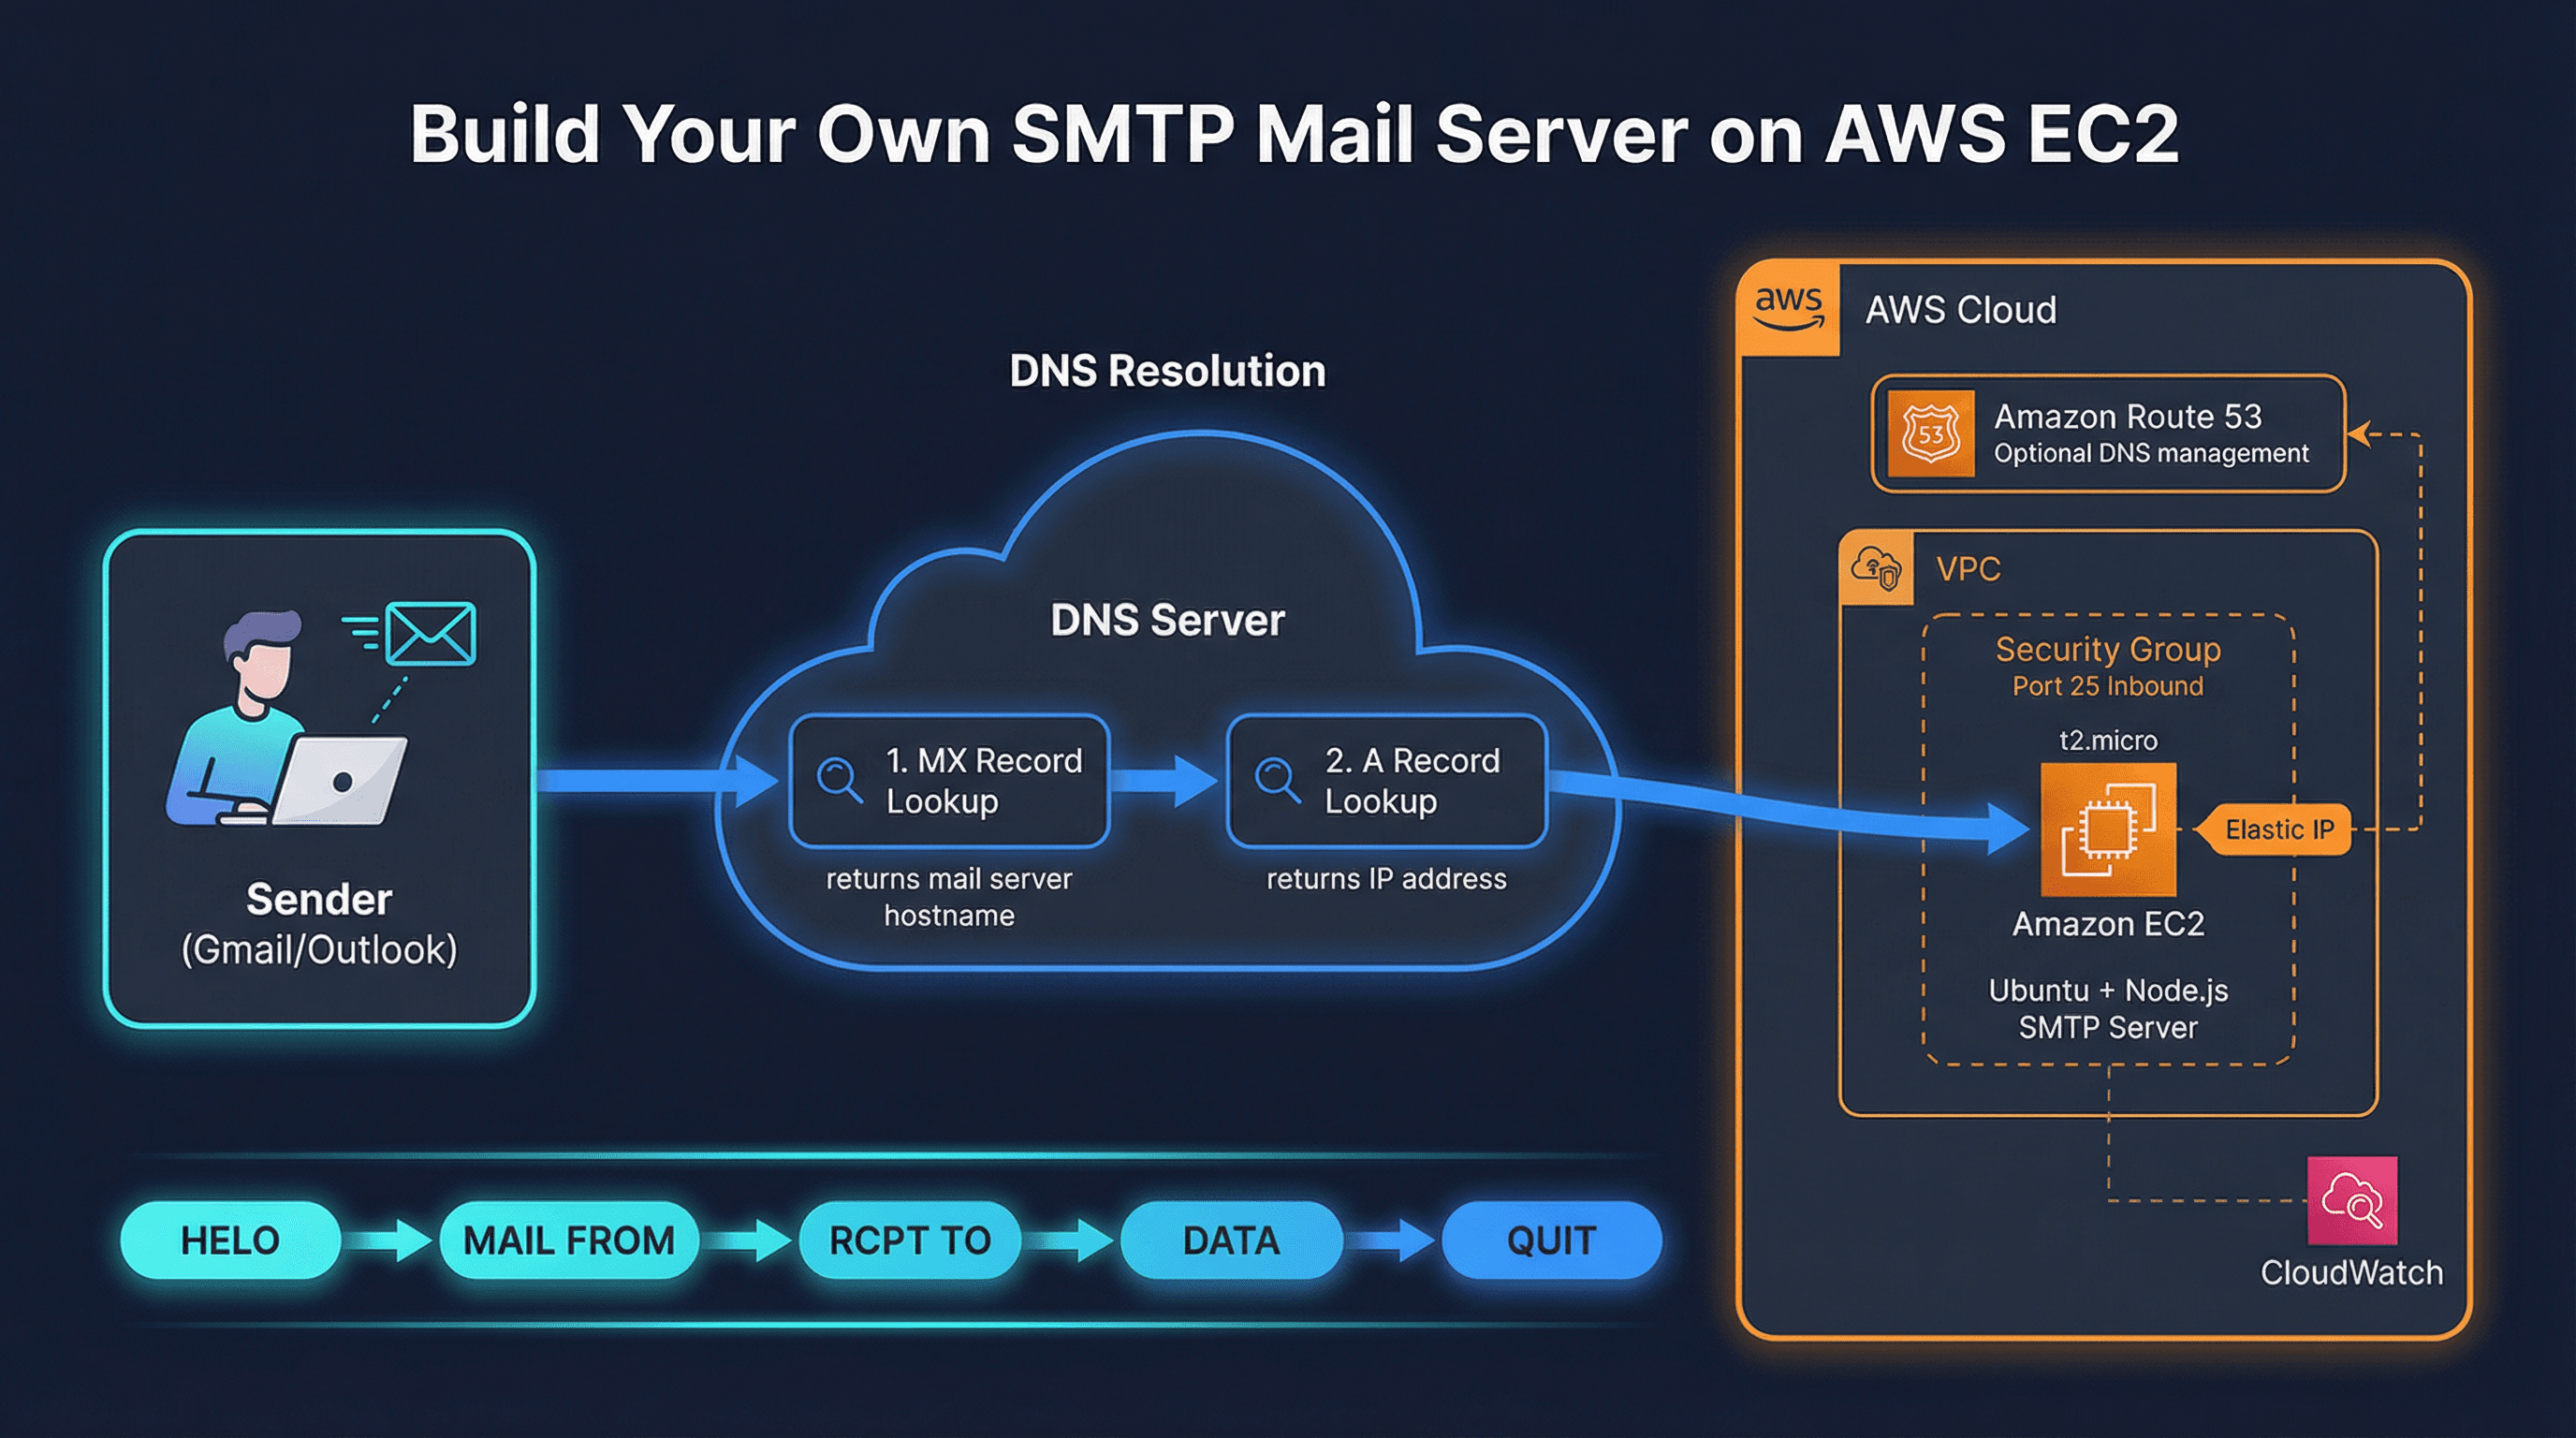
Let's say Piyush (using Gmail) wants to send an email to Abhay (using Outlook).
Here's the step-by-step flow:
MX Record Lookup — Piyush's mail server generates a DNS query on
outlook.comto find the MX (Mail Exchanger) Record. This tells it which server is responsible for handling incoming mail for that domain.A Record Lookup — The MX record returns a hostname (e.g.,
mailserver.outlook.com). A second DNS query resolves this hostname to an IPv4 address using the A Record.SMTP Connection — Piyush's server opens a TCP connection to the resolved IP on port 25 and begins the SMTP handshake to deliver the message.
DNS Records Every Mail Server Needs
Before your server can send or receive email reliably, you need to configure several DNS records:
| Record | Purpose |
|---|---|
| MX | Specifies which mail server handles email for your domain |
| A | Maps your mail server's hostname to its public IPv4 address |
| SPF | Defines which servers are authorized to send email on behalf of your domain (prevents spoofing) |
| DKIM | Adds a cryptographic signature to outgoing emails, verifying sender identity and message integrity |
| DMARC | Builds on SPF and DKIM to define how receiving servers should handle authentication failures |
SMTP Protocol — The Handshake
SMTP communication follows a structured command sequence. Here's how the conversation between two servers typically flows:
| Command | Description |
|---|---|
HELO |
Initiates the SMTP session; the client introduces itself to the server |
MAIL FROM |
Declares the sender's email address |
RCPT TO |
Specifies the recipient's email address |
DATA |
Requests permission to begin transmitting the email body |
QUIT |
Terminates the SMTP session |
Default SMTP Ports:
Port 25 — Standard SMTP
Port 465 — SMTP over SSL/TLS (secure)
Step 1 — Launch an EC2 Instance on AWS
Head over to the AWS Management Console and launch a new EC2 instance.
Recommended Configuration:
AMI: Ubuntu Server 22.04 LTS (or latest)
Instance Type:
t2.micro(Free Tier eligible — perfect for this project)Key Pair: Create or select an existing SSH key pair
Network: Ensure the instance has a public IP address (we'll configure the security group shortly)
💡 Why EC2? Amazon EC2 gives you full control over your server environment — including the operating system, network configuration, and security policies. It's ideal for running custom services like an SMTP server where you need to open specific ports and manage DNS records pointing to your instance's public IP.
Step 2 — Install Node.js and npm
SSH into your EC2 instance and install Node.js:
sudo apt update
sudo apt install nodejs npm -y
node -v
You should see output similar to:
v18.x.x
Tip: For the latest LTS version, consider using nvm (Node Version Manager) instead of the default apt package.
Step 3 — Install the SMTP Server Package
Create a project directory and install the smtp-server npm package:
mkdir smtp-server && cd smtp-server
npm init -y
npm install smtp-server
Step 4 — Write the SMTP Server Code
Create a file called index.js:
nano index.js
Paste the following Node.js code:
const { SMTPServer } = require("smtp-server");

const server = new SMTPServer({
  allowInsecureAuth: true,
  authOptional: true,

  onConnect(session, cb) {
    console.log(`[CONNECT] Session ID: ${session.id}`);
    cb();
  },

  onMailFrom(address, session, cb) {
    console.log(`[MAIL FROM] \({address.address} | Session: \){session.id}`);
    cb();
  },

  onRcptTo(address, session, cb) {
    console.log(`[RCPT TO] \({address.address} | Session: \){session.id}`);
    cb();
  },

  onData(stream, session, cb) {
    let emailData = "";
    stream.on("data", (chunk) => {
      emailData += chunk.toString();
    });
    stream.on("end", () => {
      console.log(`[DATA] Email content:\n${emailData}`);
      cb();
    });
  },
});

server.listen(25, () => {
  console.log("✅ SMTP Server is running on port 25");
});
This creates a minimal SMTP server that logs every incoming email connection, sender, recipient, and message body — great for understanding the protocol in action.
Step 5 — Configure the EC2 Security Group
Back in the AWS EC2 Console, navigate to your instance's Security Group and add the following inbound rule:
| Type | Protocol | Port Range | Source |
|---|---|---|---|
| Custom TCP | TCP | 25 | 0.0.0.0/0 (or restrict as needed) |
⚠️ Security Note: Opening port 25 to
0.0.0.0/0is fine for testing, but in production you should restrict access and implement authentication. AWS also throttles port 25 by default on EC2 — you may need to submit a request to remove the restriction for outbound SMTP traffic.
Step 6 — Configure DNS Records
Go to your domain registrar (or Amazon Route 53 if you manage DNS through AWS) and add the following records:
| Record Type | Host | Value | TTL |
|---|---|---|---|
| A | mail.yourdomain.com |
<Your EC2 Public IP> |
300 |
| MX | yourdomain.com |
mail.yourdomain.com (Priority: 10) |
300 |
🔑 Pro Tip: If you're using Amazon Route 53 for DNS management, you can associate an Elastic IP with your EC2 instance. This ensures your server's IP remains static, even if you stop/start the instance — critical for reliable mail delivery.
Step 7 — Start the Server
You can start the server directly with Node:
sudo node index.js
For production persistence, use PM2 (a Node.js process manager):
sudo npm install -g pm2
sudo pm2 start index.js
sudo pm2 save
sudo pm2 startup
You should see:
✅ SMTP Server is running on port 25
Step 8 — Test by Sending an Email
Open any email client (Gmail, Yahoo, Outlook) and send a test email to:
anything@yourdomain.com
Check your EC2 terminal — you should see the SMTP handshake logs appear in real time:
[CONNECT] Session ID: abc123
[MAIL FROM] sender@gmail.com | Session: abc123
[RCPT TO] anything@yourdomain.com | Session: abc123
[DATA] Email content:
Subject: Test Email
Hello from Gmail!
🎉 Congratulations! You've just built a working SMTP server on AWS EC2.
AWS Services Used
| Service | Purpose |
|---|---|
| Amazon EC2 | Hosts the SMTP server on a virtual Linux machine in the cloud |
| Security Groups | Acts as a virtual firewall to control inbound/outbound traffic on port 25 |
| Elastic IP (optional) | Provides a static public IP for consistent DNS resolution |
| Amazon Route 53 (optional) | Managed DNS service for configuring MX and A records |
What's Next?
This tutorial sets up a basic receive-only SMTP server for learning purposes. To take it further, consider:
Adding TLS encryption with Let's Encrypt certificates for secure communication
Configuring SPF, DKIM, and DMARC records for email authentication
Using Amazon SES alongside your custom server for reliable outbound email delivery
Implementing Postfix or Haraka for a production-grade mail transfer agent
Monitoring server health with Amazon CloudWatch
Wrapping Up
Building an SMTP server from scratch is one of the best ways to understand how email really works at the protocol level. By hosting it on Amazon EC2, you get the flexibility of full server access combined with the reliability and scalability of AWS infrastructure.
If this post helped you, feel free to drop a ❤️ and share it with someone learning about cloud infrastructure!
Have questions or want to connect? Find me on LinkedIn.