Mastering Kubernetes Cluster Autoscaler on Amazon EKS: A Complete Guide
🚀 TL;DR: If your pods are stuck in
Pendingstate because there aren't enough nodes — Cluster Autoscaler (CA) is your answer. This guide walks you through everything from IAM setup to a full production deployment on Amazon EKS.
👋 Who Is This For?
| Level | What You'll Get |
|---|---|
| 🟢 Beginner | Understand what CA is and why you need it |
| 🟡 Intermediate | Full step-by-step installation on EKS |
| 🔴 Advanced | Multi-node group strategies, expander policies, best practices |
🤔 The Problem — Why Does Autoscaling Even Matter?
Imagine your application is running fine on Amazon EKS with 3 nodes. Suddenly, a traffic surge hits — a flash sale, a major client onboarding, or a viral event. Your Kubernetes Deployment tries to spin up 10 more pods — but there's no room on existing nodes. Those pods sit in Pending state, requests time out, and your users see errors.
You could manually add nodes — but who's watching at 2 AM on a Sunday?
This is exactly where Cluster Autoscaler (CA) steps in. It watches for Pending pods and automatically scales your EC2 node count up or down via AWS Auto Scaling Groups — no human intervention needed.
🧠 Section 1: What Is Cluster Autoscaler? (Beginner)
Cluster Autoscaler is an open-source Kubernetes component that runs as a Deployment inside your cluster (in the kube-system namespace). It does two things:
Scale Up 📈 — When pods are unschedulable (Pending), CA adds new EC2 nodes
Scale Down 📉 — When nodes are underutilized, CA safely drains and removes them
How It Works (Every 10 Seconds)
Are there any Pending pods?
YES → Find a Node Group that can fit them → Tell ASG to increase capacityAre any nodes underutilized (< 50% by default)?
YES → Can all pods fit elsewhere? → Drain node → Terminate EC2 instance
💡 Key Insight: CA doesn't look at CPU/Memory usage. It looks at resource REQUESTS defined in your pod spec. Always set
resources.requestsor CA won't scale!
CA vs HPA vs Karpenter
| Tool | What it Scales | How |
|---|---|---|
| HPA | Pod replicas | Based on CPU/memory metrics |
| CA | EC2 Nodes | Based on pending pods + AWS ASG |
| Karpenter | EC2 Nodes | Dynamic, just-in-time, more flexible |
Think of it this way: HPA scales your app. CA scales your infrastructure.
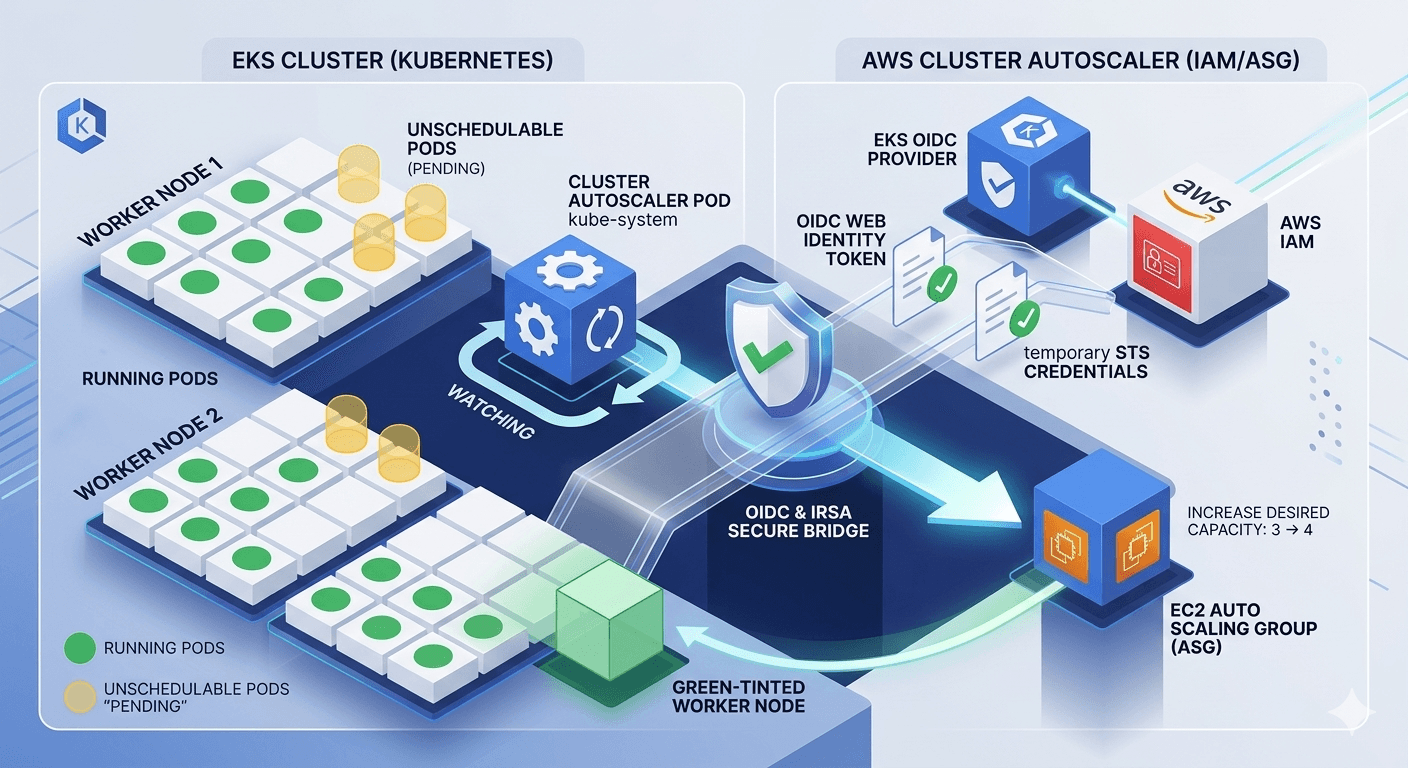
🏗️ Section 2: Architecture Overview

The OIDC + IRSA bridge is the key — it lets the CA pod (inside Kubernetes) make authenticated AWS API calls without storing any long-lived credentials.
🛠️ Section 3: Full Installation Guide (Intermediate)
Prerequisites Checklist
Before you begin, make sure you have:
✅ An active Amazon EKS Cluster (v1.24+)
✅
kubectlconfigured and pointing to your cluster✅
eksctlinstalled (v0.160+)✅
aws cliv2 configured with admin permissions✅ Node Groups created with ASG enabled (
--asg-accessflag)
Step 1: Enable IAM OIDC Provider
OIDC is an identity bridge — it lets Kubernetes ServiceAccounts assume AWS IAM Roles, so your CA pod can call AWS APIs securely without hardcoding credentials.
export CLUSTER_NAME=<your-cluster-name>
export AWS_REGION=ap-south-1   # Change to your region

# Enable OIDC for your cluster
eksctl utils associate-iam-oidc-provider \
  --region $AWS_REGION \
  --cluster $CLUSTER_NAME \
  --approve

# Verify
aws eks describe-cluster --name $CLUSTER_NAME \
  --query "cluster.identity.oidc.issuer" --output text
Step 2: Create IAM Policy
Save the following as iam-policy.json. This policy defines exactly what CA is allowed to do in AWS — describe ASGs, set desired capacity, and terminate instances.
{
    "Version": "2012-10-17",
    "Statement": [
        {
            "Action": [
                "autoscaling:DescribeAutoScalingGroups",
                "autoscaling:DescribeAutoScalingInstances",
                "autoscaling:DescribeLaunchConfigurations",
                "autoscaling:DescribeTags",
                "autoscaling:SetDesiredCapacity",
                "autoscaling:TerminateInstanceInAutoScalingGroup",
                "ec2:DescribeLaunchTemplateVersions"
            ],
            "Resource": "*",
            "Effect": "Allow"
        }
    ]
}
aws iam create-policy
--policy-name AmazonEKSClusterAutoscalerPolicy
--policy-document file://iam-policy.json
Note down the Policy ARN from the output — you'll need it in the next step.
Step 3: Create IAM Role + Kubernetes ServiceAccount (IRSA)
IRSA (IAM Roles for Service Accounts) annotates a Kubernetes ServiceAccount with an IAM Role ARN, so only the CA pod gets AWS permissions — nothing else.
export AWS_ACCOUNT_ID=$(aws sts get-caller-identity --query Account --output text)

eksctl create iamserviceaccount \
  --cluster=$CLUSTER_NAME \
  --namespace=kube-system \
  --name=cluster-autoscaler \
  --attach-policy-arn=arn:aws:iam::${AWS_ACCOUNT_ID}:policy/AmazonEKSClusterAutoscalerPolicy \
  --override-existing-serviceaccounts \
  --approve
If you prefer to apply the ServiceAccount manually, save this as cluster-autoscaler-sa.yaml and replace the role ARN:
apiVersion: v1
kind: ServiceAccount
metadata:
  name: cluster-autoscaler
  namespace: kube-system
  annotations:
    eks.amazonaws.com/role-arn: arn:aws:iam::<YOUR-ACCOUNT-ID>:role/<YOUR-IAM-ROLE-NAME>
kubectl apply -f cluster-autoscaler-sa.yaml
Step 4: Apply RBAC — ClusterRole, Role, and Bindings
Save the following as cluster-autoscaler-rbac.yaml:
apiVersion: rbac.authorization.k8s.io/v1
kind: ClusterRole
metadata:
  name: cluster-autoscaler
  labels:
    k8s-addon: cluster-autoscaler.addons.k8s.io
    k8s-app: cluster-autoscaler
rules:
- apiGroups: [""]
  resources: ["events", "endpoints"]
  verbs: ["create", "patch"]
- apiGroups: [""]
  resources: ["pods/eviction"]
  verbs: ["create"]
- apiGroups: [""]
  resources: ["pods/status"]
  verbs: ["update"]
- apiGroups: [""]
  resources: ["endpoints"]
  resourceNames: ["cluster-autoscaler"]
  verbs: ["get", "update"]
- apiGroups: [""]
  resources: ["nodes"]
  verbs: ["watch", "list", "get", "update"]
- apiGroups: [""]
  resources: ["namespaces", "pods", "services", "replicationcontrollers", "persistentvolumeclaims", "persistentvolumes"]
  verbs: ["watch", "list", "get"]
- apiGroups: ["extensions"]
  resources: ["replicasets", "daemonsets"]
  verbs: ["watch", "list", "get"]
- apiGroups: ["policy"]
  resources: ["poddisruptionbudgets"]
  verbs: ["watch", "list"]
- apiGroups: ["apps"]
  resources: ["statefulsets", "replicasets", "daemonsets"]
  verbs: ["watch", "list", "get"]
- apiGroups: ["storage.k8s.io"]
  resources: ["storageclasses", "csinodes", "csidrivers", "csistoragecapacities"]
  verbs: ["watch", "list", "get"]
- apiGroups: ["batch", "extensions"]
  resources: ["jobs"]
  verbs: ["get", "list", "watch", "patch"]
- apiGroups: ["coordination.k8s.io"]
  resources: ["leases"]
  verbs: ["create"]
- apiGroups: ["coordination.k8s.io"]
  resourceNames: ["cluster-autoscaler"]
  resources: ["leases"]
  verbs: ["get", "update"]
***
apiVersion: rbac.authorization.k8s.io/v1
kind: Role
metadata:
  name: cluster-autoscaler
  namespace: kube-system
  labels:
    k8s-addon: cluster-autoscaler.addons.k8s.io
    k8s-app: cluster-autoscaler
rules:
- apiGroups: [""]
  resources: ["configmaps"]
  verbs: ["create", "list", "watch"]
- apiGroups: [""]
  resources: ["configmaps"]
  resourceNames: ["cluster-autoscaler-status", "cluster-autoscaler-priority-expander"]
  verbs: ["delete", "get", "update", "watch"]
***
apiVersion: rbac.authorization.k8s.io/v1
kind: ClusterRoleBinding
metadata:
  name: cluster-autoscaler
  labels:
    k8s-addon: cluster-autoscaler.addons.k8s.io
    k8s-app: cluster-autoscaler
roleRef:
  apiGroup: rbac.authorization.k8s.io
  kind: ClusterRole
  name: cluster-autoscaler
subjects:
- kind: ServiceAccount
  name: cluster-autoscaler
  namespace: kube-system
***
apiVersion: rbac.authorization.k8s.io/v1
kind: RoleBinding
metadata:
  name: cluster-autoscaler
  namespace: kube-system
  labels:
    k8s-addon: cluster-autoscaler.addons.k8s.io
    k8s-app: cluster-autoscaler
roleRef:
  apiGroup: rbac.authorization.k8s.io
  kind: Role
  name: cluster-autoscaler
subjects:
- kind: ServiceAccount
  name: cluster-autoscaler
  namespace: kube-system
kubectl apply -f cluster-autoscaler-rbac.yaml
Step 5: Deploy Cluster Autoscaler
Save the following as cluster-autoscaler-deployment.yaml.
⚠️ Replace
<YOUR-CLUSTER-NAME>on the--node-group-auto-discoveryline.
⚠️ Match the image version (v1.27.3in example) to your EKS cluster version. E.g., EKS 1.30 → usev1.30.x
apiVersion: apps/v1
kind: Deployment
metadata:
  name: cluster-autoscaler
  namespace: kube-system
  labels:
    app: cluster-autoscaler
spec:
  replicas: 1
  selector:
    matchLabels:
      app: cluster-autoscaler
  template:
    metadata:
      labels:
        app: cluster-autoscaler
      annotations:
        prometheus.io/scrape: 'true'
        prometheus.io/port: '8085'
        cluster-autoscaler.kubernetes.io/safe-to-evict: 'false'
    spec:
      priorityClassName: system-cluster-critical
      serviceAccountName: cluster-autoscaler
      securityContext:
        runAsNonRoot: true
        runAsUser: 65534
        fsGroup: 65534
        seccompProfile:
          type: RuntimeDefault
      containers:
        - name: cluster-autoscaler
          image: registry.k8s.io/autoscaling/cluster-autoscaler:v1.27.3
          resources:
            limits:
              cpu: 100m
              memory: 600Mi
            requests:
              cpu: 100m
              memory: 600Mi
          command:
            - ./cluster-autoscaler
            - --v=4
            - --stderrthreshold=info
            - --cloud-provider=aws
            - --skip-nodes-with-local-storage=false
            - --expander=least-waste
            - --node-group-auto-discovery=asg:tag=k8s.io/cluster-autoscaler/enabled,k8s.io/cluster-autoscaler/<YOUR-CLUSTER-NAME>
            - --balance-similar-node-groups
            - --skip-nodes-with-system-pods=false
            - --scale-down-delay-after-add=10m
            - --scale-down-unneeded-time=10m
          volumeMounts:
            - name: ssl-certs
              mountPath: /etc/ssl/certs/ca-certificates.crt
              readOnly: true
          imagePullPolicy: "Always"
          securityContext:
            allowPrivilegeEscalation: false
            capabilities:
              drop: [ALL]
            readOnlyRootFilesystem: true
      volumes:
        - name: ssl-certs
          hostPath:
            path: "/etc/ssl/certs/ca-bundle.crt"
kubectl apply -f cluster-autoscaler-deployment.yaml
Step 6: Tag Your ASG Node Groups
CA uses tags to discover which Auto Scaling Groups it should manage. Add these two tags to your Node Group's ASG in AWS Console or CLI:
| Tag Key | Tag Value |
|---|---|
k8s.io/cluster-autoscaler/enabled |
true |
k8s.io/cluster-autoscaler/<YOUR-CLUSTER-NAME> |
owned |
aws autoscaling create-or-update-tags \
  --tags \
  "ResourceId=<YOUR-ASG-NAME>,ResourceType=auto-scaling-group,Key=k8s.io/cluster-autoscaler/enabled,Value=true,PropagateAtLaunch=true" \
  "ResourceId=<YOUR-ASG-NAME>,ResourceType=auto-scaling-group,Key=k8s.io/cluster-autoscaler/<YOUR-CLUSTER-NAME>,Value=owned,PropagateAtLaunch=true"
Step 7: Verify Everything Is Working
# Check the pod is Running
kubectl get pods -n kube-system | grep cluster-autoscaler

# Watch live logs
kubectl logs -f deployment/cluster-autoscaler -n kube-system
🗂️ Section 4: Node Group Strategies — The "NodePool" Equivalent (Advanced)
Unlike Karpenter (which has NodePool and EC2NodeClass CRDs), CA works with pre-defined EKS Node Groups (ASGs).
| Karpenter Concept | CA Equivalent |
|---|---|
EC2NodeClass |
Launch Template |
NodePool |
EKS Managed Node Group (ASG) |
NodePool limits |
ASG Min/Max size |
NodePool labels/taints |
Node Group labels & taints |
Here's a production-ready multi-node-group config using eksctl. Save as production-nodegroups.yaml:
apiVersion: eksctl.io/v1alpha5
kind: ClusterConfig

metadata:
  name: <YOUR-CLUSTER-NAME>
  region: ap-south-1

managedNodeGroups:

  # Pool 1: General Purpose (always-on baseline)
  - name: general-ng
    instanceType: m5.xlarge
    minSize: 2
    maxSize: 10
    desiredCapacity: 2
    labels:
      workload: general
      lifecycle: on-demand
    tags:
      k8s.io/cluster-autoscaler/enabled: "true"
      k8s.io/cluster-autoscaler/<YOUR-CLUSTER-NAME>: "owned"
    iam:
      withAddonPolicies:
        autoScaler: true

  # Pool 2: High Memory (scale from zero for data workloads)
  - name: highmem-ng
    instanceType: r5.2xlarge
    minSize: 0
    maxSize: 5
    desiredCapacity: 0
    labels:
      workload: high-memory
    taints:
      - key: dedicated
        value: high-memory
        effect: NoSchedule
    tags:
      k8s.io/cluster-autoscaler/enabled: "true"
      k8s.io/cluster-autoscaler/<YOUR-CLUSTER-NAME>: "owned"
      k8s.io/cluster-autoscaler/node-template/label/workload: "high-memory"
      k8s.io/cluster-autoscaler/node-template/taint/dedicated: "high-memory:NoSchedule"

  # Pool 3: Spot Instances (cost savings for batch/non-critical)
  - name: spot-ng
    instanceTypes: ["m5.xlarge", "m5a.xlarge", "m4.xlarge"]
    spot: true
    minSize: 0
    maxSize: 20
    desiredCapacity: 0
    labels:
      lifecycle: spot
      workload: batch
    tags:
      k8s.io/cluster-autoscaler/enabled: "true"
      k8s.io/cluster-autoscaler/<YOUR-CLUSTER-NAME>: "owned"
eksctl create nodegroup -f production-nodegroups.yaml
Scheduling Pods to Specific Node Groups
# Example: Schedule a high-memory pod to the highmem-ng pool
spec:
  nodeSelector:
    workload: high-memory
  tolerations:
    - key: dedicated
      value: high-memory
      effect: NoSchedule
  containers:
    - name: app
      image: your-image:latest
      resources:
        requests:           # REQUIRED for CA to work!
          cpu: "2"
          memory: "8Gi"
⚙️ Section 5: Expander Strategies
When multiple node groups can accommodate a pending pod, CA uses an Expander to decide which one to pick:
| Expander | Behavior | Best For |
|---|---|---|
least-waste |
Picks group with least wasted resources after scaling | Recommended |
random |
Picks randomly | Testing only |
most-pods |
Picks group that schedules the most pods | High-density |
priority |
You assign priority order to node groups | Fine-grained control |
price |
Prefers cheapest node type | Cost-sensitive |
Set it in your deployment:
- --expander=least-waste
Section 6: Test Your Setup
# Create a deployment that will trigger scale-up
kubectl create deployment inflate \
  --image=public.ecr.aws/eks-distro/kubernetes/pause:3.7 \
  --replicas=10

kubectl set resources deployment inflate \
  --requests=cpu=1,memory=1Gi

# Watch pods — some will go Pending, then get scheduled on new nodes
kubectl get pods -w

# Watch CA logs in real-time
kubectl logs -f deployment/cluster-autoscaler -n kube-system | grep -E "scale_up|ScaleUp"

# Watch new nodes join
kubectl get nodes -w

# Cleanup — triggers scale-down after ~10 minutes
kubectl delete deployment inflate
Section 7: Production Best Practices
Always set
resources.requests— CA is blind without them; it won't scale if requests aren't definedUse
PodDisruptionBudgets (PDB)— Protects critical pods during scale-down drainingPin CA version to EKS version — Use
v1.30.xfor EKS 1.30; version mismatch breaks scalingUse
--balance-similar-node-groups— Spreads nodes evenly across AZs for high availabilityAdd
safe-to-evict: "false"on CA pod itself — Prevents it from being evicted during scale-downDon't mix instance families in one ASG — Keep node groups homogeneous for predictable scaling
Monitor with Prometheus — CA exposes metrics on port
8085; scrape and alert on scaling events
Section 8: Troubleshooting
| Issue | Likely Cause | Fix |
|---|---|---|
| Pods stuck in Pending, no new nodes | ASG tags missing or wrong | Verify tags on your ASG match --node-group-auto-discovery |
Permission denied errors in logs |
IAM Role misconfigured | Check role trust relationship + OIDC annotation on ServiceAccount |
CrashLoopBackOff on CA pod |
Wrong image version or bad command flags | Match image to EKS version; check --node-group-auto-discovery flag |
| Scale-down not happening | scale-down-unneeded-time not elapsed or PDB blocking |
Wait 10 min; check PodDisruptionBudgets |
| Scale-from-zero not working | Node group labels missing as ASG tags | Add node-template/label/ and node-template/taint/ tags to ASG |
# Always start debugging here
kubectl logs -n kube-system deployment/cluster-autoscaler
CA vs Karpenter — Which One Should You Use in 2026?
| Factor | Cluster Autoscaler | Karpenter |
|---|---|---|
| Setup Complexity | Moderate | Higher |
| Scaling Speed | 2–5 min | 30–60 sec |
| Instance Flexibility | Fixed per ASG | Dynamic, any type |
| Cost Optimization | Good with Spot | Excellent (node consolidation) |
| EKS Auto Mode support | No | Yes (native) |
| Maturity & Stability | ⭐⭐⭐⭐⭐ Battle-tested | ⭐⭐⭐⭐ Growing fast |
Wrapping Up
Cluster Autoscaler is the backbone of production Kubernetes infrastructure on AWS. Set it up correctly with proper Node Groups, IRSA, and resource requests — and it will silently keep your cluster right-sized, saving both cost and on-call headaches.
Key Takeaways:
🔐 OIDC + IRSA = Secure, credential-free AWS authentication from Kubernetes
🗂️ Node Groups = Your pre-defined capacity pools (CA's version of Karpenter's NodePools)
📦 Always set
resources.requests— CA depends on it entirely⚖️ Use
least-wasteexpander for cost efficiency📊 Watch CA logs — they're incredibly detailed and tell you exactly what's happening