Implementing Traefik on AWS EKS with Network Load Balancer (NLB): A Complete Guide
TL;DR: This blog walks you through deploying Traefik as an Ingress Controller on AWS EKS using an AWS Network Load Balancer (NLB), covering setup, configuration, known limitations, and best practices — all in one place.
What is Traefik and Why Use It on EKS?
When you run multiple services inside a Kubernetes cluster, you need something to manage how external traffic reaches each service. That's where an Ingress Controller comes in.
Traefik is a cloud-native, open-source Ingress Controller and reverse proxy that automatically discovers your services and routes traffic to them — no manual route updates needed.
📖 Official Docs: What is Traefik?
On AWS EKS (Elastic Kubernetes Service), Traefik pairs naturally with an AWS Network Load Balancer (NLB) to handle high-throughput, low-latency traffic routing at Layer 4 (TCP/UDP).
Why Traefik over the default AWS ALB Ingress Controller?
More feature-rich routing rules (path, headers, middlewares)
Built-in dashboard for monitoring
Automatic SSL via AWS ACM
Prometheus metrics out of the box
No separate ALB per service (cost-effective)
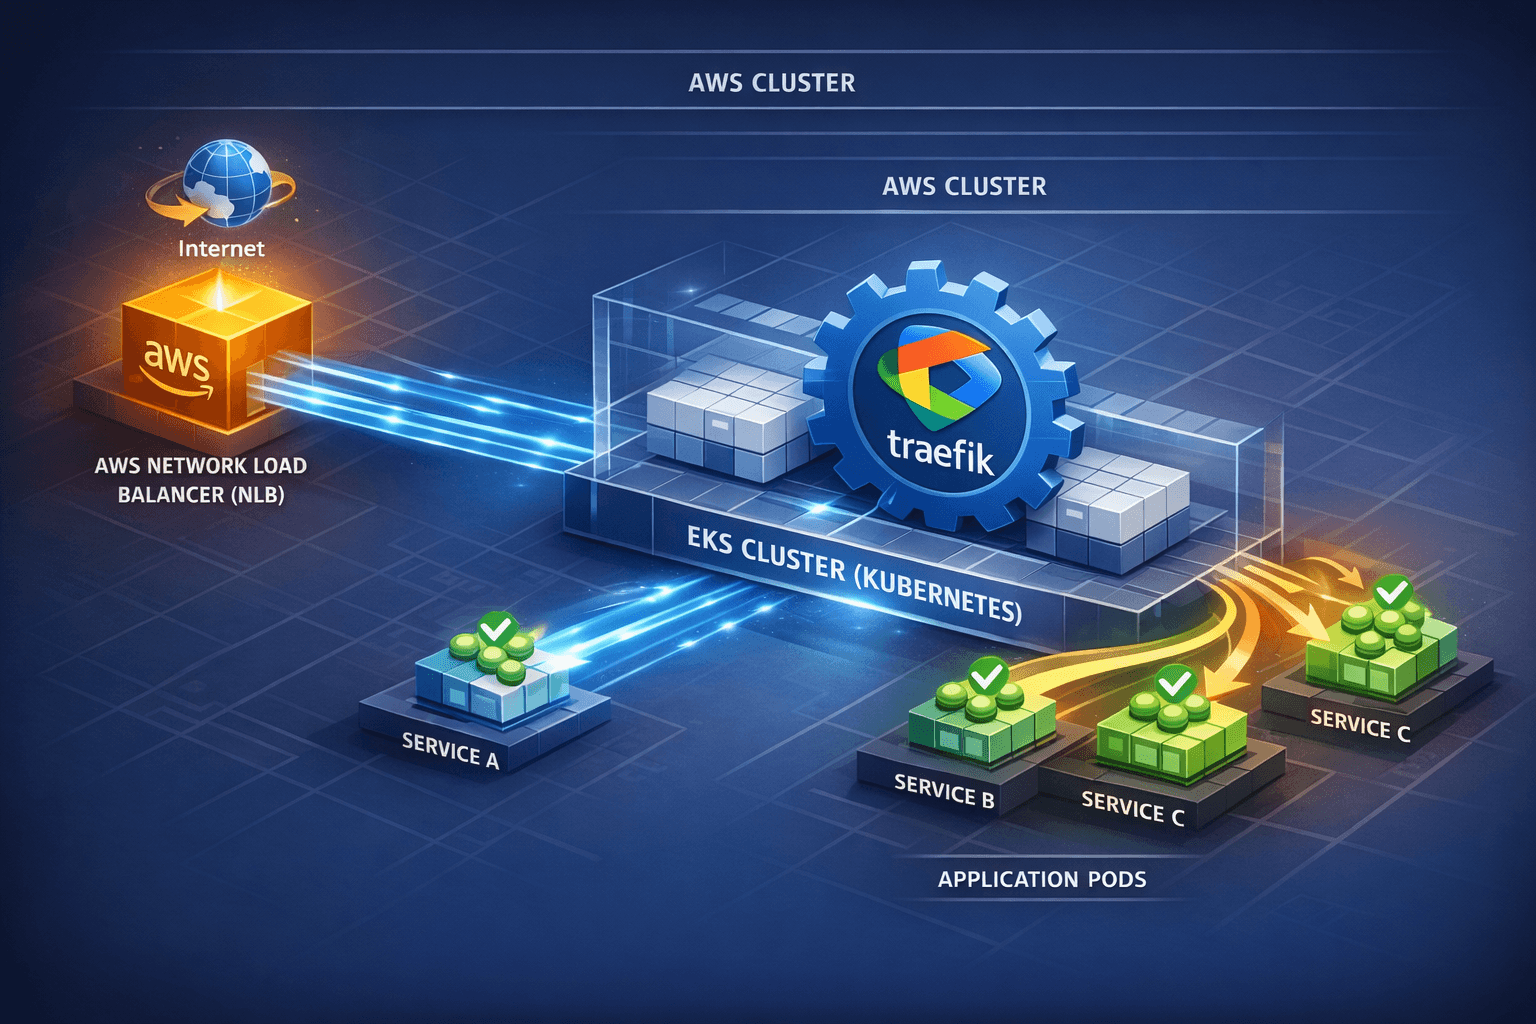
Architecture Overview
Here's how the traffic flows in this setup:
Internet
↓
AWS Network Load Balancer (NLB)
↓
Traefik Ingress Controller (running on EKS pods)
↓
Your Kubernetes Services / Apps
The NLB acts as the entry point from the internet. It forwards all traffic to Traefik, which then applies routing rules to send requests to the right service inside the cluster.
Prerequisites
Before you begin, make sure the following are in place:
| Requirement | Details |
|---|---|
| AWS EKS Cluster | A running and configured Kubernetes cluster on EKS |
kubectl |
Installed and connected to your EKS cluster |
Helm |
Version 3+ installed (Install Helm) |
| Traefik Helm Chart | v3 > 3.9.0 |
| AWS IAM Permissions | Permissions to create Load Balancers, ACM certificates, Security Groups |
| ACM Certificate | SSL certificate created in AWS Certificate Manager (ACM) |
📖 Traefik Installation Guide: https://doc.traefik.io/traefik/getting-started/install-traefik/
Step 1: Add Traefik Helm Repository
helm repo add traefik https://helm.traefik.io/traefik
helm repo update
This adds the official Traefik Helm chart repository to your local Helm setup.
📖 Reference: Traefik Helm Chart Docs
Step 2: Create the custom-values.yaml Configuration
Create a file named custom-values.yaml with the following configuration. Each section is explained below.
ingressClass:
  enabled: true
  isDefaultClass: true

providers:
  kubernetesCRD:
    enabled: true
    namespaces:
      - traefik-app-server
  kubernetesIngress:
    enabled: true
    namespaces:
      - traefik-app-server
      - default

ingressRoute:
  dashboard:
    enabled: true
    matchRule: Host(`traefik-dashboard.yourdomain.com`) && (PathPrefix(`/dashboard`) || PathPrefix(`/api`))
    services:
      - name: api@internal
        kind: TraefikService
    entryPoints: ["web"]
    middlewares:
      - name: auth
        namespace: traefik-app-server

service:
  annotations:
    service.beta.kubernetes.io/aws-load-balancer-type: nlb
    service.beta.kubernetes.io/aws-load-balancer-nlb-target-type: ip
    service.beta.kubernetes.io/aws-load-balancer-scheme: "internet-facing"
    service.beta.kubernetes.io/aws-load-balancer-ssl-cert: "<your-acm-cert-arn>"
    service.beta.kubernetes.io/aws-load-balancer-access-log-enabled: "true"
    service.beta.kubernetes.io/aws-load-balancer-backend-protocol: "http"
    service.beta.kubernetes.io/aws-load-balancer-subnets: <your-subnet-ids>
    service.beta.kubernetes.io/aws-load-balancer-security-groups: <your-sg-ids>
    service.beta.kubernetes.io/aws-load-balancer-target-group-attributes: preserve_client_ip.enabled=true

ports:
  web:
    port: 8000
    exposedPort: 443
  websecure:
    port: 8443
    exposedPort: 443
  traefik:
    port: 8080
    exposedPort: 8080

globalArguments:
  - "--api.insecure=true"
  - "--servertransport.insecureskipverify=true"

externalTrafficPolicy: Cluster

logs:
  general:
    format: json
    level: "INFO"
    noColor: true
  access:
    enabled: true
    format: json
    bufferingSize: 100
    filters:
      statuscodes: "200-299"
    addInternals: false

metrics:
  prometheus:
    entryPoint: metrics
    addRoutersLabels: true
    addServicesLabels: true
    buckets: "0.1,0.3,1.2,5.0"
What Each Section Does
ingressClass — Makes Traefik the default ingress controller in your cluster.
providers — Tells Traefik to watch for both IngressRoute (CRD) and standard Ingress resources in specified namespaces.
ingressRoute.dashboard — Configures the Traefik dashboard with a specific hostname and path, protected by auth middleware.
service annotations — These AWS-specific annotations automatically trigger the creation of an NLB when Traefik is deployed. Key ones:
aws-load-balancer-type: nlb→ Use NLB instead of CLBaws-load-balancer-scheme: internet-facing→ Public internet accessibleaws-load-balancer-ssl-cert→ Attach your ACM certificate for HTTPSpreserve_client_ip.enabled=true→ Preserve the real client IP
ports — Maps Traefik's internal ports to external exposed ports.
logs — Enables JSON-formatted access logs, filtering only successful (2xx) HTTP responses.
metrics — Enables Prometheus scraping for monitoring Traefik performance.
Step 3: Install Traefik Using Helm
helm install traefik traefik/traefik \
  --namespace traefik-app-server \
  --create-namespace \
  -f custom-values.yaml
Verify the pods are running:
kubectl get pods -n traefik-app-server
Step 4: Verify the AWS NLB is Created
After installation, AWS automatically provisions an NLB based on the annotations in custom-values.yaml. Verify by:
Going to AWS Console → EC2 → Load Balancers and look for the new NLB
Or run:
kubectl get svc -n traefik-app-server traefik
You should see an external hostname (the NLB DNS name) in the EXTERNAL-IP column.
Step 5: Configure IngressRoute for Your Services
Create an IngressRoute resource to route traffic to your apps:
apiVersion: traefik.io/v1alpha1
kind: IngressRoute
metadata:
  name: my-app-route
  namespace: traefik-app-server
spec:
  entryPoints:
    - web
  routes:
    - match: Host(`myapp.yourdomain.com`)
      kind: Rule
      services:
        - name: my-app-service
          port: 80
Apply it:
kubectl apply -f my-app-ingressroute.yaml
Step 6: Enable Metrics and Logging
Prometheus metrics are already enabled in custom-values.yaml.
Verify Traefik is exposing metrics:
kubectl port-forward svc/traefik 8080:8080 -n traefik-app-server
Then visit http://localhost:8080/metrics in your browser.
Check Traefik logs:
kubectl logs <traefik-pod-name> -n traefik-app-server
⚠️ Known Issue: Nested NLB + AWS Global Accelerator and Client IP Preservation
This is a critical limitation you must be aware of before designing your architecture.
What is the Scenario?
Many production teams try to achieve two goals simultaneously:
Use AWS Global Accelerator — to reduce latency globally by routing traffic through AWS's private backbone network
Preserve the original Client IP — so that their apps can use the real user IP for security rules, geo-blocking, rate limiting, and analytics
A natural architecture that seems to solve both is a Nested NLB setup:
Internet
   ↓
AWS Global Accelerator
   ↓
NLB #1 (TCP Listeners) ← Global Accelerator Endpoint
   ↓
NLB #2 (TLS Listeners) ← Target Group of NLB #1
   ↓
Traefik on EKS
The idea here is:
NLB #1 handles Global Accelerator traffic and forwards it to NLB #2
NLB #2 handles TLS termination and forwards to Traefik
This way, you get global acceleration AND SSL handling via ACM
Sounds logical, right? But it doesn't work.
Why Does the Issue Arise?
When NLB #1 tries to route traffic to NLB #2's ENI (Elastic Network Interface) as a target, AWS blocks Client IP preservation. This is because:
AWS explicitly does not support Client IP preservation when a target
group contains the ENI of another Network Load Balancer or AWS PrivateLink ENIs.
**📖 Official AWS Reference:
**NLB Target Groups — Client IP Preservation
In simple words — when NLB #1 forwards packets to NLB #2, the source IP (original client IP) gets replaced with NLB #1's IP. By the time the request reaches Traefik and your app, you see the NLB's IP, not the user's real IP.
What is the Real-World Impact?
This limitation breaks several things your application may depend on:
| Feature Affected | Why it Breaks |
|---|---|
| IP-based rate limiting | You rate-limit the NLB IP, not the real user |
| Geo-blocking / GeoIP rules | NLB's IP is from AWS datacenter, not user's country |
| Security rules / WAF | Cannot block/allow specific client IPs |
| Analytics & Traffic analysis | All traffic appears to come from one IP |
| Audit logs | No real user IP in logs for compliance |
The Root Cause (Technical)
In a standard NLB setup with Client IP Preservation enabled, the NLB simply forwards the TCP packet as-is to the target, preserving the source IP in the packet header. The target (Traefik pod) sees the real client IP directly.
But when NLB #2 is itself a target inside NLB #1's target group, NLB #1 needs to rewrite the destination IP of the packet to point to NLB #2's ENI. In this rewrite process, AWS's networking layer cannot maintain both the source IP and perform the destination rewrite simultaneously for chained NLBs.
Troubleshooting Common Issues
| Issue | Cause | Fix |
|---|---|---|
| NLB not created | Wrong or missing service annotations | Re-check custom-values.yaml service annotations, especially subnet IDs and security group IDs |
| Dashboard not accessible | DNS or IngressRoute misconfiguration | Verify DNS resolves to NLB, check matchRule in ingressRoute config |
| SSL not working | Wrong ACM certificate ARN | Verify the ARN in aws-load-balancer-ssl-cert annotation matches your ACM cert |
| Client IP showing as NLB IP | Client IP Preservation disabled or nested NLB issue | Enable preserve_client_ip.enabled=true in target group attributes; avoid nested NLB setup |
Best Practices
Always protect the Traefik dashboard with authentication middleware an unprotected dashboard exposes your entire routing configuration.
Use AWS ACM for SSL certificates instead of managing certs manually — ACM handles renewals automatically.
Enable Prometheus metrics and connect to Grafana for a complete observability setup.
For internal-only services, change the NLB scheme to
internal:service.beta.kubernetes.io/aws-load-balancer-scheme: "internal"Automate Helm deployments via CI/CD pipelines (GitHub Actions, ArgoCD) for consistent and repeatable deployments.
Avoid Nested NLB setups if Client IP preservation is critical for your application — use single NLB with Proxy Protocol v2 instead.
Conclusion
Traefik on AWS EKS with NLB is a powerful, production-ready setup that gives
you fine-grained traffic control, automatic service discovery, SSL management,
and rich observability. However, when designing for advanced scenarios like
Global Accelerator with Client IP preservation, be aware of AWS's nested NLB
limitations and plan your architecture accordingly.